A broken hinge on your deck box can quickly turn convenient outdoor storage into a frustrating eyesore. Whether it’s a cracked plastic hinge from sun exposure, a metal hinge ripped from its fastenings, or a living hinge that’s simply given up, restoring functionality to your deck box is often a straightforward DIY project. You don’t always need to buy a new box; with a few common household tools and a bit of ingenuity, you can have your deck box lid swinging smoothly and securely in no time. This guide will walk you through identifying the problem, gathering the right materials, and executing effective repairs, helping you save money and prolong the life of your outdoor storage.
Understanding Deck Box Hinges and Common Failures
Deck box hinges are the pivotal components that allow the lid to open and close, protecting your stored items from the elements. Their importance cannot be overstated, as a failing hinge compromises the box’s primary function. These hinges come in several common configurations, each with its own vulnerabilities. Integrated plastic hinges, often molded directly into the deck box lid and body, are prevalent in many budget-friendly plastic models. They rely on the flexibility and durability of the plastic itself. Metal hinges, typically found on more robust or wooden deck boxes, consist of two leaves joined by a pin and are attached with screws or rivets. Continuous or piano hinges, a longer version of the metal hinge, distribute stress along the entire length of the lid.
Despite their design, hinges are often the first part of a deck box to fail. Common issues include plastic hinges cracking or becoming brittle due to UV exposure and temperature fluctuations. For screw-mounted hinges, the plastic around the screw holes can strip or tear, causing the hinge to detach. Metal hinges might rust, bend, or their fastening points can weaken. Even robust designs can succumb to repetitive stress, overfilling the box, or strong winds forcing the lid open too far. Identifying the specific type of hinge damage is the first critical step towards a successful repair.
Essential Tools and Materials for Hinge Repair
Tackling a broken deck box hinge requires the right arsenal of tools and materialsHaving these on hand before you begin will streamline the repair process and ensure a lasting fix.
Adhesives and Fillers
For plastic repairs, epoxy is often your best friend. Products like JB Weld PlasticWeld are excellent for filling stripped screw holes and bonding various plastics, offering a high-strength, durable bond. However, ensure the epoxy is suitable for outdoor use and potentially resistant to moisture. Plastic cement or solvent-based adhesives work by melting the plastic surfaces together, creating a strong, cohesive bond; specific types are designed for different plastics like ABS, PVC, or polystyrene. For quick, temporary fixes or small cracks, super glue (cyanoacrylate) can be used, but it may not hold up to sustained stress or specific plastic types like polyethylene (PE) and polypropylene (PP). For these harder-to-bond plastics, specialized plastic bonding systems, often involving a primer and an adhesive, are recommended.
Hardware and Reinforcement
|
Our Picks for the Best Deck Box in 2026
As an Amazon Associate I earn from qualifying purchases.
|
||
| Num | Product | Action |
|---|---|---|
| 1 | YITAHOME Outdoor Storage Box, 45 Gallon Waterproof Resin Deck Box, Lockable Organizer for Patio, Poolside, Deck, Cushions, Throw Pillows, Garden Tools, Brown |

|
| 2 | Keter XXL 230 Gallon Deck Storage Box Outdoor Patio Container ~ White |
|
| 3 | EAST OAK Outdoor Storage Box, 31 Gallon Deck Box Indoor and Outdoor Use, Waterproof Resin Storage Bin for Package Delivery, Patio Cushions, Gardening Tools, Lockable, UV Resistant, Grey |
|
| 4 | Keter Signature Everwood 50 Gallon Resin Deck Box for Outdoor Storage – Weather‑Resistant Balcony & Patio Box for Cushions, Throw Pillows & Garden Tools, Walnut |
|
| 5 | Keter City 30 Gallon Resin Outdoor Storage Box and Patio Furniture Side Table for Pool and Garden Accessories, Brown |
|
| 6 | Outdoor Storage Box, 30 Gallon Resin Waterproof Deck Box, Lockable, Built-in Handle, Outside Storage Container for Patio, Garden and Garage |
|
| 7 | Keter Kentwood 50 Gallon Resin Deck Box for Outdoor Storage – Weather‑Resistant Balcony & Patio Box for Cushions, Throw Pillows & Garden Tools, Dark Grey |
|
| 8 | VEVOR Outdoor Storage Box, 150 Gallon Waterproof PE Tarpaulin Deck Box w/Galvanized Frame, All-Weather Protection & Portable, for Camping, Garden, Poolside, and Yard, Black & Green |
|
| 9 | Keter City Outdoor Plastic Storage Box Garden Furniture 57.8 x 44 x 54.8 cm - Brown |
|
| 10 | Suncast Outdoor Deck Box - 22 Gallon Java Resin Outdoor Storage Box, Weatherproof Patio Storage Bin Container for Seating & Organizing Cushions, Tools & Towels for Pool, Yard, & Garden |
|
When adhesives aren’t enough, or if the original mounting points are severely damaged, you’ll need hardware. Small screws and washers are essential for reattaching metal hinges or reinforcing new attachment points. Metal plates (e.g., small galvanized steel mending plates or straps) can be used as backing or external reinforcement where plastic has torn. For a complete hinge overhaul, consider a continuous metal hinge (also known as a piano hinge) which distributes force evenly along the lid. Pop rivets provide a strong, permanent attachment method, especially useful when replacing plastic hinges with metal ones. For temporary or minor fixes, cable ties or strong, weather-resistant duct tape (such as Gorilla tape) can provide a surprisingly effective short-term solution.
Basic Tools
No repair is possible without fundamental tools. You’ll likely need a drill and a set of drill bits for making new pilot holes or preparing for rivets. Screwdrivers (Phillips and flathead) are indispensable for fastening or removing hardware. A utility knife or box cutter is useful for trimming excess plastic, tape, or preparing surfaces. Clamps can help hold pieces together while adhesives cure, and sandpaper (medium grit) will rough up surfaces for better adhesive adhesion. For plastic welding (a more advanced technique), a heat gun or even a strong blow dryer might be required, though professional plastic welders offer superior results.
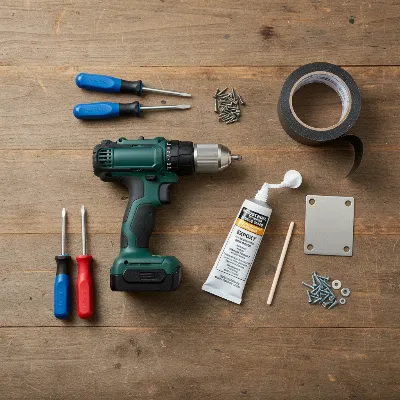 Essential tools and materials for repairing a broken deck box hinge
Step-by-Step Guide to Repairing Different Hinge Problems
Addressing a broken deck box hinge can seem daunting, but by breaking it down into specific repair scenarios, you can tackle the issue effectively. Always start by thoroughly cleaning the damaged area to ensure good adhesion or a clean surface for drilling.
Fixing Cracked or Broken Plastic Hinges
Plastic hinges often crack due to material fatigue, UV degradation, or excessive force.
- Clean and Prepare: Use rubbing alcohol to clean the cracked area, removing dirt, grime, and oils. Lightly sand the immediate area around the crack with fine-grit sandpaper to create a rough surface for better adhesive bonding.
- Align and Secure: Carefully align the broken pieces. If possible, use clamps or strong tape to hold them firmly in place while the adhesive sets.
- Apply Adhesive:
- For minor cracks: A plastic-specific adhesive or super glue might suffice, applied sparingly along the crack.
- For larger breaks or structural cracks: Two-part epoxy is usually the best choice. Mix the epoxy according to the manufacturer’s instructions and apply it generously to both sides of the crack. You can also embed a small piece of plastic mesh or a thin metal strip into the epoxy on the underside for added reinforcement while it cures.
- Cure Time: Allow the adhesive to cure fully, following the product’s recommendations. This might take several hours or even overnight. Avoid stressing the hinge during this period.
- Plastic Welding (Advanced): If you have a heat gun and plastic welding rods (matching the type of plastic, often HDPE or PP), you can melt and fuse the plastic. This creates a very strong bond, but it requires practice and specific tools. Apply heat evenly and use the filler rod to bridge the crack, smoothing it out as it cools.
Repairing Detached Hinges (Screws Pulled Out)
When hinge screws rip through the plastic or wood, the original mounting points are compromised.
- Assess Damage: Examine the torn area. If the damage is minimal and there’s enough solid material nearby, you might simply drill new holes.
- Fill and Re-anchor (Plastic):
- Clean the damaged area thoroughly.
- Mix a strong two-part epoxy and fill the stripped or torn screw holes completely. Allow it to cure fully until rock hard. This effectively rebuilds the damaged plastic.
- Once cured, place the hinge back in its original position, mark new pilot holes slightly offset from the filled ones (or directly into the filled epoxy if solid), and drill new pilot holes.
- Attach the hinge with new, slightly larger screws if possible, ensuring they grip firmly into the newly formed plastic or untouched material. Adding flat washers can increase the surface area and reduce the chance of future tear-outs.
- Reinforce with Metal Plates (Plastic or Wood): For added strength, especially on plastic deck boxes, consider using small galvanized steel mending plates or straps.
- Position a metal plate on the inside of the lid or box wall, spanning the damaged area.
- Drill pilot holes through the hinge, the deck box material, and the metal plate.
- Secure the hinge using screws that pass through all layers, or use pop rivets for a very strong, permanent bond.
- Drill New Holes (Wood/Minimal Plastic Damage): If there’s plenty of solid material surrounding the original holes, simply move the hinge slightly and drill new pilot holes. Ensure the new holes are far enough from the old ones to get a good grip.
Upgrading to a More Durable Hinge
Sometimes, the original hinges are simply not robust enough for the job. Upgrading to a continuous metal hinge can provide a much more durable solution.
- Remove Old Hinges: Carefully remove all remnants of the old, broken hinges, trimming any protruding plastic or wood.
- Select New Hinge: Purchase a continuous (piano) hinge made of a weather-resistant material like stainless steel or galvanized steel, matching the length of your deck box lid.
- Position and Mark: Place the continuous hinge along the back edge of the deck box, ensuring the hinge barrel aligns with the seam between the lid and the main body. Use a marker to mark all the screw holes or rivet points on both the lid and the box.
- Drill Pilot Holes: Use an appropriate drill bit to create pilot holes at each marked point. For plastic, start with a small bit to avoid cracking, then widen if necessary. For wood, drill pilot holes slightly smaller than your screws to ensure a tight fit.
- Attach Hinge:
- Screws: Align the hinge and screw it into place. Avoid overtightening, which can strip plastic.
- Pop Rivets: For a robust, permanent bond, especially on plastic, pop rivets are excellent. Drill holes slightly larger than the rivet diameter. Insert rivets through the hinge and the deck box, then use a pop rivet gun to secure them firmly.
- Test Functionality: Once installed, open and close the lid several times to ensure smooth operation and secure attachment.
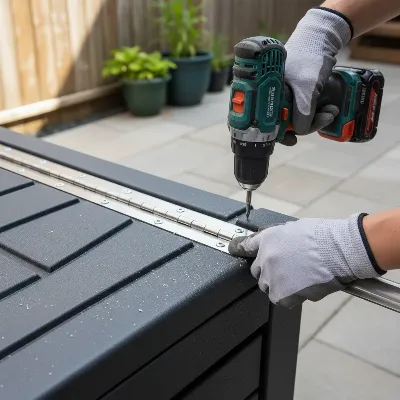 Continuous metal hinge being installed on a deck box
Quick Fixes vs. Long-Term Solutions for Your Deck Box
Deciding between a quick patch-up and a more permanent repair depends on several factors, including your urgency, budget, the type of deck box, and how frequently it’s used.
| Repair Method | Ease of Application | Durability | Cost | Recommended For |
|---|---|---|---|---|
| Duct Tape / Cable Ties | Very Easy | Low | Very Low | Emergency fixes, temporary solutions, low-stress areas |
| Super Glue | Easy | Low-Medium | Low | Small cracks, minor detachment, non-load-bearing areas |
| Epoxy (Filled Holes) | Medium | Medium-High | Medium | Stripped screw holes, cracked plastic (rebuilding) |
| Metal Plates/Straps | Medium | Medium-High | Medium | Reinforcing torn plastic, weak attachment points |
| Continuous Hinge & Rivets/Screws | High | High | Medium-High | Permanent upgrade, complete hinge replacement, heavy use |
| Plastic Welding | High (requires skill) | High | Medium (tools) | Strong repair for compatible plastics, structural integrity |
Quick fixes like duct tape or cable ties are excellent for immediate needs, such as securing a lid during a storm or preventing further damage until a proper repair can be made. However, they are rarely aesthetic or long-lasting. Super glue offers a slightly more durable quick fix for small, clean breaks but lacks the structural integrity for load-bearing hinges.
Long-term solutions involve methods that rebuild or replace the hinge mechanism. Using epoxy to fill stripped holes provides a strong new base for screws, significantly improving durability compared to just re-drilling. Installing metal reinforcement plates behind torn plastic or upgrading to a full metal continuous hinge offers the most robust and lasting repair, essentially making the hinge stronger than its original design. While these options require more time and effort, the longevity and reliability they offer are well worth the investment for a frequently used deck box.
Preventative Maintenance to Extend Deck Box Hinge Lifespan
Even the best repair won’t last forever without proper care. Implementing a few preventative maintenance tips can significantly extend the lifespan of your deck box hinges and prevent future breakages.
One of the most crucial steps is to avoid overfilling your deck box. Excess weight can put undue stress on the hinges and the entire structure, leading to premature failure. Distribute weight evenly if possible, and ensure the lid isn’t straining to close. Similarly, always close the lid gently. Slamming it shut or letting it fall open abruptly can cause impacts that weaken hinge integrity over time. Consider adding soft-close mechanisms if your deck box allows for them, or simply guide the lid with both hands.
Regular cleaning of the hinge area helps prevent grime and debris from accumulating, which can impede smooth operation and cause wear. For metal hinges, periodically lubricating the hinge pin with a silicone spray or a small amount of grease can reduce friction and prevent rust, particularly in humid or wet environments. Inspect hinges seasonally for any early signs of wear, such as small cracks or loose fasteners. Addressing these minor issues promptly can prevent them from escalating into major repairs. Ensuring your deck box is placed on a level surface can also prevent unnecessary torsion on the lid and hinges, contributing to overall longevity.
When to Consider Replacing Your Deck Box
While repairing a broken hinge is often a viable and cost-effective solution, there comes a point when replacement becomes the more sensible option. It’s essential to assess the overall condition of your deck box to determine if the repair effort is truly worthwhile.
Consider the severity and extent of the damage. If multiple hinges are broken, the plastic is extensively cracked beyond the hinge areas, or the structural integrity of the entire box is compromised (e.g., large holes, widespread brittleness), then a repair might only be a temporary band-aid. A severely deteriorated box won’t effectively protect its contents regardless of hinge function.
Another factor is the cost-effectiveness of the repair. If the price of replacement hinges, specialized adhesives, or other repair materials approaches the cost of a new, entry-level deck box, then investing in a new unit might be more economical in the long run. This is particularly true for older, cheaper plastic deck boxes where the material itself might be at the end of its life, making any repair a short-lived fix. A new deck box will offer improved features, aesthetics, and a full warranty.
If your deck box is frequently used, exposed to harsh weather, or stores valuable items, ensuring its reliability is paramount. A recurring hinge problem after multiple repair attempts or significant overall deterioration signals that it’s time to retire the old deck box and invest in a new one that can reliably meet your storage needs.
Conclusion
Fixing a broken deck box hinge at home is a practical skill that can save you money and keep your outdoor storage functional. Whether you’re dealing with a simple crack, detached screws, or opting for a full hinge upgrade, understanding the different repair methods and materials available empowers you to choose the best solution for your situation. From quick adhesive fixes to robust new hardware installations, restoring your deck box’s functionality is often more straightforward than you might imagine. to assess the damage, gather the right tools, and consider both short-term convenience and long-term durability. By taking a proactive approach to repair and maintenance, you can ensure your deck box remains a reliable companion for years to come. What’s the most unusual item you’ve ever stored in your deck box that highlights its importance?
Frequently Asked Questions
What type of glue works best for plastic deck boxes?
For plastic deck boxes, two-part epoxy is generally recommended for its high strength and ability to fill gaps, especially for repairing stripped screw holes or larger cracks. For specific plastics like polyethylene or polypropylene, specialized plastic bonding systems that include a primer often provide the best adhesion. Always identify your plastic type if possible for optimal results.
Can I use duct tape for a broken deck box hinge?
While duct tape, especially heavy-duty varieties like Gorilla tape, can provide a quick, temporary fix for a broken deck box hinge, it is not a long-term solution. It lacks the structural strength for frequent use and will eventually degrade due to weather exposure. Use it for emergencies or until a more permanent repair can be made.
How can I prevent my deck box hinges from breaking again?
To prevent future hinge breaks, avoid overfilling your deck box to reduce stress on the lid and hinges. Always open and close the lid gently, and consider adding soft-close mechanisms if feasible. Regularly clean hinges and, for metal parts, apply a lubricant to prevent rust and reduce friction. Seasonal inspections can help catch minor issues before they become major problems.
Is it worth fixing a cheap plastic deck box hinge?
Yes, often it is worth fixing a cheap plastic deck box hinge, especially if the rest of the box is in good condition. Simple repairs like filling stripped holes with epoxy, reinforcing with metal plates, or even installing a new continuous metal hinge can significantly extend the life of the box for a fraction of the cost of replacement. Consider replacement only if the plastic is extensively damaged or very brittle.
Get our weekly buyer guide
Practical specs, not advice. Unsubscribe anytime.
