Painting an old resin deck box without peeling is entirely achievable by using specialized plastic-specific paints and primers, combined with meticulous surface preparation. The process involves thorough cleaning, light sanding with 220-400 grit sandpaper to create a bonding surface, and applying multiple thin coats of paint. This approach ensures a durable, peel-free finish that withstands outdoor elements for 2 to 5 years or more.
Understanding Resin Deck Boxes and Painting Challenges
Resin deck boxes, often made from high-density polyethylene or similar plastics, are prized for their durability and weather resistance. However, their smooth, non-porous surface presents a significant challenge for paint adhesion. Unlike wood, which readily absorbs paint, plastic offers little for traditional paints to grip onto. This often leads to common issues like bubbling, flaking, or outright peeling, especially when exposed to outdoor temperature fluctuations and moisture.
The key to preventing these failures is recognizing that specialized products and meticulous preparation are paramount. Generic paints simply won’t bond effectively, no matter how many coats you apply. Understanding this fundamental difference is the first step toward achieving a professional, long-lasting finish that rejuvenates your old deck box rather than causing further frustration. For best outdoor storage roundups on this site.
Essential Materials and Tools for a Lasting Finish
Achieving a durable, non-peeling paint job on your resin deck box requires more than just a can of paint. Selecting the right materials and tools is crucial for surface preparation, proper adhesion, and a smooth application.
Specialized Paints and Primers
The cornerstone of a successful resin painting project is using products formulated specifically for plastic.
- Plastic-Specific Spray Paints: Brands like Krylon Fusion All-In-One or Rust-Oleum 2X Ultra Cover Painter’s Touch are highly recommended. These paints contain bonding agents that allow them to adhere directly to plastic without extensive priming. They are available in various colors and finishes, including matte, satin, and gloss, offering both protection and aesthetic appeal.
- Bonding Primers: While some plastic paints include primer, using a dedicated bonding primer designed for slick surfaces (such as Rust-Oleum Plastic Primer or an all-purpose exterior bonding primer like Stix) can significantly enhance adhesion and paint longevity, especially for severely weathered or previously painted surfaces. Look for primers with mold and mildew resistant properties for outdoor items.
Preparation Supplies
Proper surface preparation is non-negotiable for paint longevity.
- Cleaning Agents: A mild dish soap, sugar soap, or an all-purpose outdoor cleaner is essential for removing dirt, grime, and mildew. For tough stains or grease, rubbing alcohol or a degreaser can be effective.
- Sanding Materials: Fine-grit sandpaper (e.g., 220, 360, or 400-grit) or a fine-grit sanding block is needed to scuff the surface and create a “key” for the paint.
- Protective Gear: Wear gloves, safety glasses, and a respirator mask, especially when using spray paints and sanding.
- Workspace Protection: Use drop cloths, old newspapers, or cardboard to protect surrounding areas from overspray.
- Masking: Painter’s tape is vital for masking off hardware, hinges, or any areas you don’t want painted.
Application Tools
|
Our Picks for the Best Deck Box in 2026
As an Amazon Associate I earn from qualifying purchases.
|
||
| Num | Product | Action |
|---|---|---|
| 1 | YITAHOME Outdoor Storage Box, 45 Gallon Waterproof Resin Deck Box, Lockable Organizer for Patio, Poolside, Deck, Cushions, Throw Pillows, Garden Tools, Brown |

|
| 2 | Suncast Outdoor Deck Box - 22 Gallon Java Resin Outdoor Storage Box, Weatherproof Patio Storage Bin Container for Seating & Organizing Cushions, Tools & Towels for Pool, Yard, & Garden |
|
| 3 | Outdoor Storage Box, 30 Gallon Resin Waterproof Deck Box, Lockable, Built-in Handle, Outside Storage Container for Patio, Garden and Garage |
|
| 4 | Keter XXL 230 Gallon Deck Storage Box Outdoor Patio Container ~ White |
|
| 5 | VEVOR Outdoor Storage Box, 150 Gallon Waterproof PE Tarpaulin Deck Box w/Galvanized Frame, All-Weather Protection & Portable, for Camping, Garden, Poolside, and Yard, Black & Green |
|
| 6 | Keter Signature Everwood 50 Gallon Resin Deck Box for Outdoor Storage – Weather‑Resistant Balcony & Patio Box for Cushions, Throw Pillows & Garden Tools, Walnut |
|
| 7 | Keter City 30 Gallon Resin Outdoor Storage Box and Patio Furniture Side Table for Pool and Garden Accessories, Brown |
|
| 8 | EAST OAK Outdoor Storage Box, 31 Gallon Deck Box Indoor and Outdoor Use, Waterproof Resin Storage Bin for Package Delivery, Patio Cushions, Gardening Tools, Lockable, UV Resistant, Grey |
|
| 9 | Keter Kentwood 50 Gallon Resin Deck Box for Outdoor Storage – Weather‑Resistant Balcony & Patio Box for Cushions, Throw Pillows & Garden Tools, Dark Grey |
|
| 10 | Keter City Outdoor Plastic Storage Box Garden Furniture 57.8 x 44 x 54.8 cm - Brown |
|
The right application method ensures an even, professional look.
- Spray Paint Comfort Grip: An ergonomic attachment for spray cans can make application easier and more consistent, reducing finger fatigue.
- Rags and Sponges: For cleaning and wiping dust. Microfiber cloths are excellent for dust removal.
- Pressure Washer or Garden Hose: For thorough initial cleaning, if available.
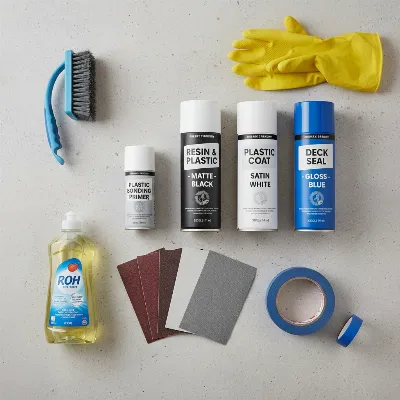 Assortment of painting supplies for resin deck boxes, including spray paint cans, primer, sandpaper, cleaning agents, gloves, and painter's tape.
Step-by-Step Guide to Painting Your Resin Deck Box
Transforming your old resin deck box into a renewed outdoor accessory requires careful attention to each step. Following this guide will help ensure a vibrant, long-lasting finish that resists peeling.
Thorough Cleaning
This initial step is crucial for paint adhesion. Any dirt, grime, or residue will prevent the paint from bonding properly.
- Remove Debris: Start by hosing down the deck box to remove loose dirt, leaves, and cobwebs.
- Wash with Soap and Water: Using a sponge or scrub brush, thoroughly clean the entire surface with a solution of mild dish soap and warm water. For tougher buildup, especially mold or mildew, an outdoor cleaner or a solution of vinegar and water can be used. Pay extra attention to corners and textured areas.
- Rinse Completely: Rinse the deck box thoroughly with clean water to remove all soap residue. Any leftover soap can interfere with paint adhesion.
- Dry Completely: Allow the deck box to dry fully. This may take several hours in the sun or overnight. Ensure there is no moisture trapped in crevices, as this can lead to peeling later. You can use a towel to speed up the process.
Surface Preparation (The Key to Adhesion)
Proper surface preparation is the most critical factor in preventing paint from peeling.
- Light Sanding: Using fine-grit sandpaper (220-400 grit) or a sanding block, lightly scuff the entire surface of the resin deck box. The goal is not to remove material but to create a microscopically rough texture, or “tooth,” that the paint can grip onto. This is especially important for any shiny or glossy areas.
- Remove Sanding Dust: After sanding, wipe down the entire deck box with a damp cloth or a tack cloth to remove all sanding dust. Let it dry completely again. You want a clean, dull, and dry surface.
- Mask Off Hardware: Use painter’s tape to carefully mask off any hinges, handles, or other hardware you do not want to paint. This ensures clean lines and protects components.
Priming (If Using a Separate Primer)
While some plastic paints are “paint + primer in one,” a dedicated primer can offer superior adhesion.
- Apply Bonding Primer: In a well-ventilated area (preferably outdoors on a calm, non-windy day), apply a thin, even coat of plastic bonding primer. Hold the can 8-12 inches from the surface and use steady, sweeping motions. Avoid applying too much in one spot to prevent drips.
- Allow to Dry: Refer to the primer manufacturer’s instructions for drying times. Typically, this is 30 minutes to a few hours before applying subsequent coats or the topcoat. Ensure the primer feels dry to the touch and isn’t tacky.
Painting Application
Now for the color! This stage is about patience and thin coats.
- Prepare Workspace: Lay down drop cloths or newspaper in a well-ventilated area, away from direct sunlight or high humidity, which can affect drying and finish.
- Shake Paint Well: Shake your can of plastic-specific spray paint vigorously for at least one minute after the mixing ball begins to rattle. Continue shaking periodically during application.
- Apply Thin Coats: Hold the can 8-12 inches from the deck box surface. Apply the paint in light, even, sweeping motions, slightly overlapping each pass. It’s better to apply multiple thin coats than one thick coat, as thick coats are prone to dripping and peeling.
- Allow Flash Time: Wait the recommended “flash time” between coats (usually 30 seconds to a few minutes, check product label). This allows solvents to evaporate and prevents tackiness.
- Build Coverage: Continue applying thin coats until you achieve the desired color and coverage. Two to three thin coats are often sufficient.
- Maintain Evenness: Pay attention to all sides and crevices for even coverage. Using a spray paint comfort grip can help maintain consistent application.
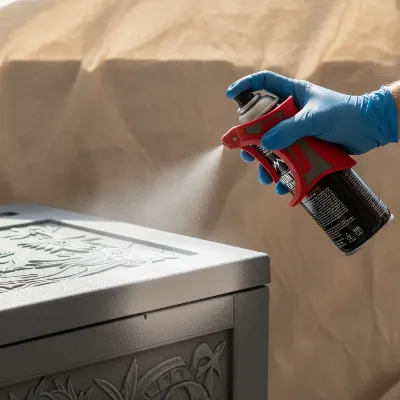 Close-up of a person's gloved hand spray painting a resin deck box with even, sweeping motions, showcasing the proper technique for a smooth, peel-free finish.
Curing and Finishing Touches
The final steps ensure durability and a polished look.
- Curing Time: After applying the final coat, allow the paint to dry to the touch according to the manufacturer’s instructions. However, it’s crucial to let the paint cure fully before heavy use or exposure to harsh weather. This can take 24-48 hours, or even longer (up to 7 days) for maximum hardness and durability.
- Remove Painter’s Tape: Carefully remove the painter’s tape while the paint is still slightly tacky but not wet. This helps prevent the tape from pulling off dried paint and ensures crisp lines. If the paint is fully dry, score the edge of the tape with a utility knife before peeling to avoid lifting.
- Inspect and Touch-Up: Examine the deck box for any missed spots, drips, or imperfections. Apply touch-up paint sparingly if needed.
Common Issues and How to Prevent Peeling
Even with careful preparation, issues can arise. Understanding common problems and their solutions is vital for maintaining a pristine finish.
The most frequent culprit behind paint peeling on resin deck boxes is poor surface preparation. If the surface isn’t thoroughly cleaned, degreased, and lightly sanded, the paint lacks the necessary adhesion points and will lift. Another common cause is moisture trapped underneath the paint film, which can happen if the deck box isn’t completely dry before painting or if water seeps in through cracks. Using incompatible paint (non-plastic specific) or applying overly thick coats also significantly increases the risk of peeling and cracking. Painting in extreme weather conditions, like high humidity or direct scorching sun, can further exacerbate these problems.
To fix existing peeling, you must address the root cause:
- Remove Loose Paint: Use a scraper or wire brush to remove all loose and flaking paint. For stubborn areas, a paint stripper designed for plastics might be necessary (test in an inconspicuous area first).
- Clean and Sand: Thoroughly clean the now exposed resin surface with soap and water, then lightly sand with fine-grit sandpaper to create a fresh “tooth.” Remove all sanding dust.
- Re-prime and Repaint: Apply a plastic bonding primer, followed by several thin coats of a plastic-specific spray paint, following the application steps outlined above.
Preventing future peeling hinges on meticulous adherence to the preparation and application process. Always choose paints and primers specifically designed for plastic outdoor use. Ensure the deck box is impeccably clean and dry before painting. Apply thin, even coats, and allow adequate drying and curing time between each layer and before exposing the box to the elements.
“The true artistry in painting resin lies not just in the color you choose, but in the meticulous effort invested in preparing the surface. Skipping steps here guarantees a short-lived finish.”
Maintaining Your Newly Painted Deck Box
Once your resin deck box is beautifully painted, a little ongoing care will keep it looking fresh and vibrant for years. Proper maintenance prevents premature fading, chipping, and peeling.
Regularly cleaning your deck box is the first line of defense. Use a mild soap and water solution with a soft cloth or sponge to wipe down the painted surfaces periodically. This removes accumulated dirt, pollen, and environmental residues that can dull the finish or, over time, degrade the paint. Avoid abrasive cleaners or harsh scrubbing pads, which can scratch the paint or weaken its bond. Always rinse thoroughly with clean water after cleaning and allow the box to air dry completely.
It’s also a good practice to regularly inspect your deck box for any signs of wear and tear, such as small chips, scratches, or minor peeling. Addressing these issues promptly can prevent them from escalating into larger problems. For small chips or scratches, gently clean the affected area, lightly scuff it with very fine-grit sandpaper (if necessary), and then apply a small amount of your original plastic-specific spray paint for a touch-up.
While modern plastic paints are designed for durability, outdoor items are constantly exposed to UV rays and weather fluctuations. Depending on your climate and the quality of paint used, planning to repaint your deck box every few years can help maintain its appearance and ensure continuous protection. This refreshes the color and renews the protective barrier, extending the life and beauty of your deck box.
Conclusion
Repainting an old resin deck box is a rewarding project that revitalizes your outdoor space and extends the life of a functional item. The key to a long-lasting, peel-free finish lies in understanding the unique nature of resin and committing to meticulous surface preparation, choosing specialized plastic-specific paints and primers, and applying them correctly in thin, even coats. By following the comprehensive steps—from thorough cleaning and sanding to careful priming, painting, and curing—you can achieve professional results that withstand the elements. With a little care and the right approach, your rejuvenated deck box will provide both beauty and practical storage for many seasons to come. What color will you choose to breathe new life into your outdoor oasis?
Frequently Asked Questions
Can I use regular house paint on a resin deck box?
No, regular house paints (latex or oil-based) are not recommended for resin or plastic surfaces. They lack the necessary bonding agents to adhere to slick plastic and will likely peel, chip, or flake over time due to poor adhesion and outdoor exposure.
Do I always need to sand a resin deck box before painting?
Yes, light sanding with fine-grit sandpaper (220-400 grit) is highly recommended. It creates a slightly roughened surface, or “tooth,” that allows the paint and primer to grip effectively, preventing peeling and ensuring a more durable finish.
How long does paint typically last on an outdoor resin deck box?
With proper preparation and the use of high-quality plastic-specific paints, a paint job on a resin deck box can last anywhere from 2 to 5 years or more. Factors like direct sun exposure, climate, and initial preparation quality will influence its longevity.
Can I paint a resin deck box that has already started peeling?
Yes, but thorough preparation is essential. You must scrape off all existing loose and peeling paint, clean the surface meticulously, and then lightly sand to create a smooth, adherent base before applying primer and new paint. Skipping this will lead to the new paint peeling as well.
Is primer necessary if my spray paint says “paint + primer”?
While “paint + primer in one” products are effective for plastic, using a separate, dedicated bonding primer for plastics can offer an extra layer of adhesion, especially on heavily weathered or extremely slick surfaces. It provides a more robust foundation for the topcoat, further minimizing the risk of peeling.
Get our weekly buyer guide
Practical specs, not advice. Unsubscribe anytime.

Great tips for painting a resin deck box. I’ve tried painting plastic before and it always peeled, so the advice on using plastic-specific paints and primers was key. My only minor complaint is that it took a bit longer than I expected with all the thin coats, but the result is definitely worth the effort for a durable finish.
I was so ready to just buy a new deck box because my old one was looking so faded and sad. I followed the steps here, especially the part about light sanding with 220-400 grit sandpaper, and it made such a difference. The paint really adhered well, and it looks brand new! I’m hoping it lasts the 5 years mentioned.
This saved me a ton of money! I have a large high-density polyethylene deck box that was perfectly functional but looked terrible. The explanation of why traditional paints don’t stick to plastic really helped me understand the process. My box now matches my patio furniture perfectly, and I’m confident it will withstand the elements.
I appreciate the detailed instructions, especially about the thorough cleaning. My deck box was pretty grimy. However, even with careful prep, I still had a tiny bit of bubbling in one small spot. It’s not super noticeable, but it was a bit frustrating after all that work. Still, it’s much better than it was.