A wooden deck box is a fantastic addition to any outdoor space, offering convenient storage for cushions, gardening tools, or pool accessories. However, without proper protection, exposure to rain, sun, and humidity can quickly lead to rot, warping, and discoloration. Protecting your investment ensures it remains functional and aesthetically pleasing for years to come. This comprehensive guide will walk you through easy, DIY steps to effectively waterproof your wooden deck box, transforming it into a durable, weather-resistant storage solution you can rely on.
Understanding Your Wooden Deck Box and Why Waterproofing is Essential
Wooden deck boxes, while charming, are inherently vulnerable to the elements. Wood is a natural material that absorbs moisture, leading to a cascade of problems if left untreated. When rainwater soaks into the wood, it can cause the fibers to swell, leading to warping and cracking as it dries. This constant expansion and contraction weakens the structure and compromises the box’s integrity. Even worse, persistent moisture creates an ideal environment for mold, mildew, and wood rot, which not only look unsightly but can also destroy the box from the inside out, turning your valuable storage into a costly repair project.
Beyond structural damage, prolonged sun exposure can also fade the wood’s natural color, making it appear dull and weathered. Waterproofing acts as a crucial barrier, repelling water, blocking harmful UV rays, and inhibiting fungal growth. By properly waterproofing your wooden deck box, you extend its lifespan significantly, maintain its aesthetic appeal, and ensure that whatever you store inside remains dry and protected. It’s an investment in both the longevity of your furniture and the safety of your outdoor essentials.
Key Considerations Before You Start Waterproofing
Before you dive into the waterproofing process, taking a moment to assess and prepare is crucial for a successful and long-lasting finish. The quality of your preparation directly impacts how well the waterproofing product adheres and performs over time. Skipping these initial considerations can lead to premature peeling, cracking, or incomplete protection, making all your hard work less effective.
Assessing Your Deck Box’s Condition
|
Our Picks for the Best Deck Box in 2026
As an Amazon Associate I earn from qualifying purchases.
|
||
| Num | Product | Action |
|---|---|---|
| 1 | Keter Kentwood 50 Gallon Resin Deck Box for Outdoor Storage – Weather‑Resistant Balcony & Patio Box for Cushions, Throw Pillows & Garden Tools, Dark Grey |

|
| 2 | Suncast Outdoor Deck Box - 22 Gallon Java Resin Outdoor Storage Box, Weatherproof Patio Storage Bin Container for Seating & Organizing Cushions, Tools & Towels for Pool, Yard, & Garden |
|
| 3 | Outdoor Storage Box, 30 Gallon Resin Waterproof Deck Box, Lockable, Built-in Handle, Outside Storage Container for Patio, Garden and Garage |
|
| 4 | Keter XXL 230 Gallon Deck Storage Box Outdoor Patio Container ~ White |
|
| 5 | YITAHOME Outdoor Storage Box, 45 Gallon Waterproof Resin Deck Box, Lockable Organizer for Patio, Poolside, Deck, Cushions, Throw Pillows, Garden Tools, Brown |
|
| 6 | Keter City 30 Gallon Resin Outdoor Storage Box and Patio Furniture Side Table for Pool and Garden Accessories, Brown |
|
| 7 | VEVOR Outdoor Storage Box, 150 Gallon Waterproof PE Tarpaulin Deck Box w/Galvanized Frame, All-Weather Protection & Portable, for Camping, Garden, Poolside, and Yard, Black & Green |
|
| 8 | EAST OAK Outdoor Storage Box, 31 Gallon Deck Box Indoor and Outdoor Use, Waterproof Resin Storage Bin for Package Delivery, Patio Cushions, Gardening Tools, Lockable, UV Resistant, Grey |
|
| 9 | Keter Signature Everwood 50 Gallon Resin Deck Box for Outdoor Storage – Weather‑Resistant Balcony & Patio Box for Cushions, Throw Pillows & Garden Tools, Walnut |
|
| 10 | Keter City Outdoor Plastic Storage Box Garden Furniture 57.8 x 44 x 54.8 cm - Brown |
|
The condition of your wooden deck box dictates the extent of preparation required. If you’re working with a brand new, unfinished box, your task will be relatively straightforward, primarily focusing on cleaning and light sanding. However, an older, weathered deck box will demand more attention. Inspect it thoroughly for any signs of existing damage such as splinters, cracks, or loose joints. Look for mildew or algae growth, which appears as dark or green patches. Any existing rot must be removed, and severely damaged sections may need replacement. Addressing these issues now will ensure a smooth, stable surface for the waterproofing treatment to bond with effectively.
Choosing the Right Time and Environment
The environment in which you waterproof your deck box plays a significant role in the outcome. Always choose a day with dry, mild weather, ideally between 50°F and 85°F (10°C and 30°C). High humidity can slow down drying times and prevent proper curing, while direct, intense sunlight can cause some products to dry too quickly, leading to an uneven finish or poor adhesion. Ensure you work in a well-ventilated area, preferably outdoors or in an open garage, to avoid inhaling fumes from sealants and stains. A clean, dust-free space is also vital, as dust particles can easily settle on wet finishes, marring the final appearance.
Gathering Your Tools and Materials
Having all your tools and materials ready before you begin will streamline the waterproofing process. For cleaning, you’ll need a stiff brush, mild detergent or a vinegar solution, and a hose or pressure washer (used carefully). Sanding requires 180-grit and 220-grit sandpaper, a sanding block, or an orbital sander. Don’t forget a tack cloth to remove sanding dust. For repairs, have wood filler and an outdoor-grade silicone caulk on hand. For application, you’ll need high-quality paintbrushes, foam rollers, or a paint sprayer, along with paint thinner if you’re using oil-based products like marine varnish. Safety gear, including gloves, eye protection, and a respirator, is also essential to protect yourself from chemicals and dust.
Step-by-Step Guide to Easily Waterproofing Your Wooden Deck Box
Waterproofing a wooden deck box is a rewarding DIY project that significantly extends its life. By following these steps carefully, you can achieve professional-grade protection with minimal fuss. The key is thorough preparation and patient application, ensuring each layer performs its best.
Thorough Cleaning and Preparation
A clean, smooth surface is paramount for any waterproofing product to adhere correctly. Start by emptying your deck box and cleaning both its interior and exterior surfaces. Use a stiff brush to remove loose dirt, cobwebs, and debris. For stubborn grime, mildew, or algae, mix a solution of mild dish soap and warm water, or equal parts water and white vinegar. Scrub the wood thoroughly, then rinse well with a hose or a low-pressure setting on a pressure washer. Allow the wood to dry completely, which can take 24-48 hours depending on humidity. Once dry, lightly sand all surfaces with 180-grit sandpaper to smooth out any rough spots and open the wood grain for better product absorption. Finish by wiping away all sanding dust with a tack cloth.
Repairing and Sealing Gaps
Even the best waterproofing sealants can’t overcome structural imperfections. Before applying any coating, meticulously inspect your deck box for any cracks, knots, nail holes, or loose joints. Use an exterior-grade wood filler to repair any holes or significant cracks, ensuring it’s compatible with the waterproofing product you plan to use. For seams, corners, and areas where panels meet, apply a thin bead of high-quality silicone caulk designed for outdoor use. Smooth the caulk with a damp cloth or a caulking tool to create a watertight seal. Allow the wood filler and caulk to cure fully according to the manufacturer’s instructions before proceeding to the next step. This sealing process is critical to prevent water from seeping into vulnerable areas.
Applying Your Chosen Waterproofing Product
With the surface clean, smooth, and sealed, it’s time to apply your waterproofing product. Whether you choose marine varnish, spar urethane, or an exterior wood sealant, the principle is the same: apply multiple thin coats for maximum durability. For the first coat, especially with varnishes, consider thinning the product slightly (e.g., 10 parts product to 1 part paint thinner for oil-based varieties) to improve penetration into the wood grain. Use a high-quality paintbrush or foam roller, applying the product evenly and working with the wood grain.
After the first coat, allow it to dry completely according to the manufacturer’s instructions, which can range from a few hours to a full day. Once dry, lightly sand the surface with 220-grit sandpaper to ensure a smooth finish and enhance adhesion for subsequent layers. Wipe away all dust with a tack cloth before applying the next coat. Repeat this process, applying at least three to four coats (or as recommended by the product manufacturer), sanding between each coat except the final one. Remember to waterproof all surfaces of the box, including the underside and interior, to ensure comprehensive protection.
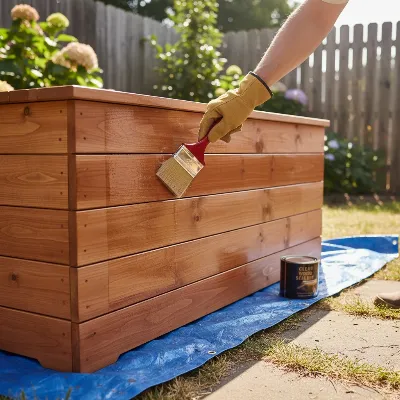 A person using a paintbrush to apply a waterproofing sealant to a wooden deck box outdoors, showing careful brush strokes along the wood grain, with good lighting and a natural background, in a realistic and editorial style
Ensuring Proper Drainage (Optional but Recommended)
For outdoor deck boxes, especially those in areas with heavy rainfall or consistent moisture, ensuring proper drainage can be an invaluable extra step. If your deck box will not be used to hold water (like a planter), consider drilling several small drainage holes (e.g., ¼-inch to ½-inch) in the bottom panel. Space them evenly to allow any accumulated moisture to escape. To prevent the holes from becoming entry points for moisture into the wood itself, coat the edges of each hole with your chosen waterproofing sealer. Additionally, placing the deck box on small feet or blocks will raise it slightly off the ground, preventing water from pooling underneath and allowing air circulation to keep the bottom dry. This simple measure significantly enhances the box’s overall longevity.
Comparing Popular Waterproofing Products for Wooden Deck Boxes
Choosing the right waterproofing product is crucial for achieving the desired level of protection and finish for your wooden deck box. Each type offers distinct advantages and disadvantages, making some more suitable for specific needs or preferences. Understanding these differences will help you make an informed decision for your DIY project.
| Product Type | Key Features | Pros | Cons | Best Use |
|---|---|---|---|---|
| Marine Varnish | High gloss, extremely durable, excellent UV and saltwater resistance. | Superior weather protection, hard finish, enhances wood grain. | Longer drying times, requires multiple thin coats, strong fumes. | Boats, highly exposed outdoor furniture, premium finish. |
| Spar Urethane | Flexible, resistant to temperature changes, good UV and moisture protection. | Durable, less prone to cracking than standard varnish, good clarity. | Can yellow over time, strong odor, requires multiple coats. | Outdoor furniture, doors, windows, where flexibility is important. |
| Oil-Based Sealant | Deep penetration, nourishing, often tinted, enhances natural wood tones. | Revitalizes old wood, excellent water repellency, natural look. | Requires more frequent reapplication, can be messy to apply. | Weathered wood, natural wood finish preference, ease of reapplication. |
| Water-Based Sealant | Low VOCs, easy cleanup, quick drying, available in clear or tinted. | Eco-friendly, minimal odor, dries fast, good for damp wood. | Less penetration than oil-based, may offer less UV protection. | General outdoor wood protection, quick projects, environmentally conscious. |
| Exterior Paint | Opaque, covers wood grain, wide range of colors, thick protective layer. | Maximum color customization, strong barrier against elements. | Hides wood grain, can chip or peel if not prepped properly. | Covering imperfections, complete color change, extreme weather exposure. |
Maintaining Your Waterproofed Deck Box for Long-Term Durability
Waterproofing your wooden deck box is not a one-time task; it’s an ongoing commitment to ensure its longevity and continued protection. Regular maintenance is key to preserving the barrier you’ve created and preventing future damage from the elements. A little proactive care can save you significant time and effort down the line, ensuring your deck box remains a reliable and attractive feature in your outdoor space.
Regular Inspection and Cleaning
Even the most robust waterproofing can eventually succumb to the rigors of outdoor exposure. Make it a habit to inspect your deck box seasonally, especially after harsh weather conditions. Look for any signs of wear, such as chipping, peeling, or fading of the finish. Check for small cracks or gaps that might have reopened due to wood movement. At the same time, keep the exterior clean by wiping it down regularly to remove dirt, pollen, and leaves. For tougher grime, a gentle wash with mild soap and water, followed by a thorough rinse, will suffice. Always allow the box to dry completely after cleaning to prevent moisture from undermining the finish.
Reapplication Guidelines
The frequency of reapplication largely depends on the type of waterproofing product used, the climate, and the amount of direct sun and rain exposure your deck box receives. Generally, most sealants and varnishes recommend reapplication every one to three years. However, some heavy-duty marine varnishes or spar urethanes might last longer, while clear sealants might need more frequent touch-ups. When the water no longer beads up on the surface of your deck box, or if the finish looks dull and worn, it’s a clear signal that a fresh coat is due. Lightly sand the existing finish (if it’s in good condition) to provide a fresh surface for the new coat to bond, then reapply as per the product’s instructions.
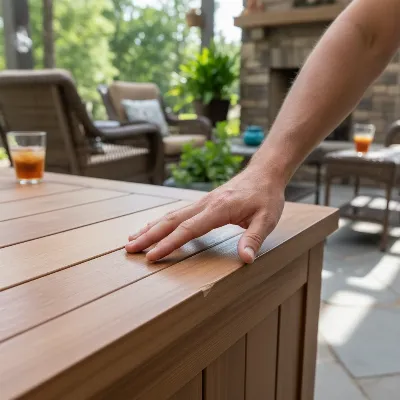 A person checking a waterproofed wooden deck box for signs of wear and tear, highlighting the importance of reapplication and maintenance, in a realistic and informative style
Troubleshooting Common Issues
Despite your best efforts, sometimes issues can arise. If you notice water spots or minor peeling, often a light sanding of the affected area and a spot reapplication of your waterproofing product can resolve the problem. If the finish is extensively peeling or flaking, it might indicate poor surface preparation or an incompatible product. In such cases, it’s best to strip the old finish completely, re-prepare the wood, and apply fresh coats. For persistent mold or mildew, after cleaning, ensure the box has good air circulation and consider an anti-mildew additive in your next coat of sealant. Remember, addressing small issues promptly prevents them from escalating into larger, more complex repairs.
“A well-maintained wooden deck box isn’t just a piece of furniture; it’s a testament to thoughtful outdoor living. The secret lies not in avoiding the elements, but in embracing smart protection.” – Sarah Jenkins, Outdoor Living Specialist at GreenSpace Design.
Conclusion
Waterproofing your wooden deck box is an indispensable step in preserving its beauty and functionality for years of outdoor enjoyment. By dedicating a bit of time to thorough preparation, selecting the right protective product, and applying it with care, you can create a robust barrier against the harshest weather conditions. Remember that consistent maintenance, including regular cleaning and timely reapplication, is key to ensuring your DIY efforts stand the test of time. Take pride in protecting your outdoor storage, allowing it to serve its purpose reliably and beautifully season after season. What will you store confidently in your newly waterproofed deck box?
Câu Hỏi Thường Gặp
How long does waterproofing a wooden deck box typically last?
The lifespan of your waterproofing treatment varies, usually ranging from one to three years, depending on the product type (e.g., varnish, sealant), local climate conditions, and the amount of direct exposure to sun and rain. Regular inspection helps determine when a reapplication is needed to maintain optimal protection.
Can I waterproof an already painted or stained wooden deck box?
Yes, but proper preparation is crucial. If the existing paint or stain is in good condition, you might be able to clean, lightly sand, and apply a compatible clear waterproofing sealant over it. However, if the old finish is peeling or damaged, it’s best to strip it completely before applying a new waterproofing treatment.
Is marine varnish really the best option for waterproofing outdoor wood?
Marine varnish is highly regarded for its exceptional durability, UV resistance, and superior protection against water, making it an excellent choice for outdoor wood that faces harsh conditions. While it offers a strong, glossy finish, it typically requires more careful application and longer drying times than some other sealants.
What should I do if my deck box already has mold or mildew?
First, clean the affected areas thoroughly using a solution of mild detergent or a mixture of equal parts water and white vinegar, scrubbing to remove all traces of mold or mildew. Rinse well and allow the wood to dry completely. For future prevention, ensure good air circulation around the box and consider a waterproofing product with mold inhibitors.
Do I need to waterproof the inside of my wooden deck box too?
While often overlooked, waterproofing the interior of your Deck Box is highly recommended. It provides an extra layer of protection against moisture seeping in from the bottom or sides, helps prevent condensation build-up, and protects the contents from humidity, mold, and mildew. Treat it with the same care as the exterior.