Creating additional outdoor storage doesn’t have to be an expensive endeavor. A DIY wood deck box offers a practical solution for stowing away cushions, gardening tools, or pool supplies, all while adding a touch of rustic charm to your patio or deck. The good news is that with careful planning and smart material choices, you can construct a durable and functional deck box without overspending. This guide will walk you through the process, focusing on cost-effective strategies and straightforward construction techniques to help you build your own storage solution that perfectly fits your space and budget.
Understanding Your Deck Box Needs
Before cutting the first piece of wood, it’s crucial to define what you need your deck box to achieve. Will it primarily store lightweight items like cushions, or heavier garden tools? Do you intend for it to double as extra seating? The purpose will directly influence its size, material strength, and overall design. Consider the available space on your deck or patio to determine the optimal dimensions, keeping in mind accessibility and how it will integrate with your existing outdoor furniture.
While a wooden deck box will offer substantial protection from the elements, it’s important to differentiate between weather-resistant and fully waterproof. For wooden boxes, deliberate small gaps between slats in the sides and bottom are often beneficial. These intentional spaces allow water to drain through and air to circulate, preventing pooling water and promoting quick drying, which ultimately extends the life of the wood. This design is excellent for keeping items dry from incidental rain but may not be suitable for items requiring complete immersion protection.
Budget-Friendly Materials for Your Deck Box
Choosing the right materials is the cornerstone of a budget-friendly DIY project. Fortunately, several wood options and hardware selections allow you to minimize costs without sacrificing durability.
Wood Choices
When selecting wood for an outdoor deck box, you’ll need materials that can withstand the elements.
- Pressure-Treated Lumber is often the most economical choice. It’s chemically treated to resist rot, decay, and insect infestation, making it ideal for outdoor use. However, pressure-treated wood is heavy, and it’s essential to allow it to dry thoroughly for several weeks or months before priming and painting or staining. Skipping this drying period can lead to adhesion issues with finishes.
- Exterior-Grade Plywood provides a solid, affordable option, especially for large panels like the bottom or sides. It’s easy to work with but must be adequately sealed, painted, or stained on all surfaces to protect against moisture.
- For those with a slightly larger budget, or if the box will be in a more protected area, Cedar or Redwood are naturally resistant to decay and insects and offer a beautiful aesthetic. They are generally more expensive than pressure-treated lumber, and availability can vary by region.
- Untreated Pine can be used for projects that will be placed under a covered porch or in a very sheltered spot, but it is the least durable option for direct outdoor exposure without significant sealing and regular maintenance.
|
Our Picks for the Best Deck Box in 2026
As an Amazon Associate I earn from qualifying purchases.
|
||
| Num | Product | Action |
|---|---|---|
| 1 | Keter Kentwood 50 Gallon Resin Deck Box for Outdoor Storage – Weather‑Resistant Balcony & Patio Box for Cushions, Throw Pillows & Garden Tools, Dark Grey |

|
| 2 | Keter XXL 230 Gallon Deck Storage Box Outdoor Patio Container ~ White |
|
| 3 | Outdoor Storage Box, 30 Gallon Resin Waterproof Deck Box, Lockable, Built-in Handle, Outside Storage Container for Patio, Garden and Garage |
|
| 4 | Suncast Outdoor Deck Box - 22 Gallon Java Resin Outdoor Storage Box, Weatherproof Patio Storage Bin Container for Seating & Organizing Cushions, Tools & Towels for Pool, Yard, & Garden |
|
| 5 | EAST OAK Outdoor Storage Box, 31 Gallon Deck Box Indoor and Outdoor Use, Waterproof Resin Storage Bin for Package Delivery, Patio Cushions, Gardening Tools, Lockable, UV Resistant, Grey |
|
| 6 | Keter City Outdoor Plastic Storage Box Garden Furniture 57.8 x 44 x 54.8 cm - Brown |
|
| 7 | Keter City 30 Gallon Resin Outdoor Storage Box and Patio Furniture Side Table for Pool and Garden Accessories, Brown |
|
| 8 | Keter Signature Everwood 50 Gallon Resin Deck Box for Outdoor Storage – Weather‑Resistant Balcony & Patio Box for Cushions, Throw Pillows & Garden Tools, Walnut |
|
| 9 | VEVOR Outdoor Storage Box, 150 Gallon Waterproof PE Tarpaulin Deck Box w/Galvanized Frame, All-Weather Protection & Portable, for Camping, Garden, Poolside, and Yard, Black & Green |
|
| 10 | YITAHOME Outdoor Storage Box, 45 Gallon Waterproof Resin Deck Box, Lockable Organizer for Patio, Poolside, Deck, Cushions, Throw Pillows, Garden Tools, Brown |
|
To save money and reduce waste, try to design your deck box around standard dimensional lumber sizes (e.g., 1×4, 1×6, 2×2, 2×4). This minimizes cuts and can often lead to more efficient material use.
Hardware Essentials
Don’t skimp on hardware, as it plays a crucial role in the longevity and functionality of your deck box.
- Screws: Use galvanized or stainless-steel exterior-grade screws to prevent rust and ensure strong connections. For a clean finish, consider using exterior pocket-hole screws with a pocket-hole jig.
- Glue: An exterior-rated wood glue will significantly enhance the strength and rigidity of your joints when combined with screws.
- Hinges: Butt hinges are common, but a continuous hinge (piano hinge) can provide extra support and stability for larger lids.
- Lid Supports: While optional, gas struts or folding lid supports are highly recommended for safety and convenience, preventing the lid from slamming shut.
- Handles and Latches: Choose weather-resistant options if you want to make the box easy to open or secure.
- Feet/Glides: Elevating the box slightly off the ground with nail-on furniture glides or simple wooden feet made from scrap lumber will prevent moisture wicking and improve airflow, crucial for preventing rot.
Finishing Products
Protecting your wood from the elements is critical for its lifespan.
- Wood Sealers: Clear sealers offer protection while allowing the natural wood grain to show through.
- Exterior Stains: Available in various colors, stains penetrate the wood to provide protection and enhance its appearance.
- Exterior Paints: Offer comprehensive protection and a wider range of color options. Always use a good quality exterior primer first, especially on pressure-treated wood.
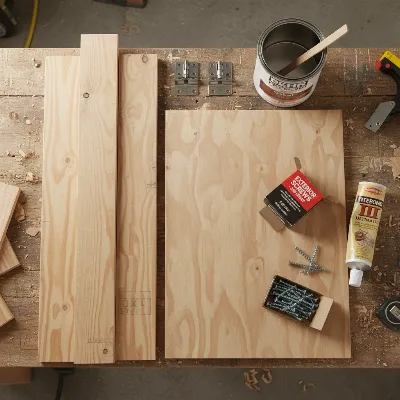 Essential materials for building a DIY wooden deck box on a tight budget
Essential Tools Without Breaking the Bank
A well-equipped toolbox doesn’t necessarily mean an expensive one. Many essential tools can be borrowed, rented, or acquired affordably.
- Basic Hand Tools: You’ll definitely need a measuring tape, a carpenter’s square, a pencil, a hammer, and various clamps to hold pieces together during assembly. Sandpaper (various grits) or a sanding block is essential for smoothing edges.
- Power Tools: A circular saw or miter saw will make precise cuts much easier and faster. A drill with a set of driver and drill bits is indispensable for pilot holes and fastening screws. A power sander (like an orbital sander) can drastically speed up the finishing process.
- Specialized Tools: A pocket-hole jig is highly recommended. It creates strong, concealed joints that are perfect for deck boxes and often makes assembly quicker and cleaner. While an initial investment, a basic jig is relatively inexpensive and a valuable addition to any DIYer’s arsenal.
To keep costs down, consider borrowing tools from friends or family members who dabble in woodworking. Local hardware stores often offer tool rental services, which can be a budget-friendly alternative to purchasing specialized equipment for a one-off project.
Simple Design Principles for a Budget-Friendly Build
Simplicity in design is your best friend when building on a budget. Complex angles, intricate joinery, or non-standard dimensions will inevitably lead to more material waste, more cuts, and more time, all of which translate to higher costs.
- Rectangular or Square Shapes: These are the easiest to frame and build, requiring straightforward cuts and minimizing lumber waste.
- Optimizing for Standard Lumber Sizes: Design your box so that its dimensions align closely with common lumber lengths (e.g., 8-foot, 10-foot, 12-foot boards). This reduces the need for excessive cutting and minimizes scrap wood.
- Incorporating Ventilation and Drainage: As discussed, for outdoor longevity, it’s wise to design the box with small gaps (e.g., 1/8″ to 1/4″) between bottom slats and possibly side slats. This allows for water drainage and air circulation, preventing moisture buildup and rot.
- Considering a Dual-Purpose Design: A simple, sturdy rectangular box can easily double as a bench. By reinforcing the lid and choosing appropriate dimensions, you get both storage and extra seating, maximizing its value.
“A well-planned design saves both materials and effort. Simple shapes and standard lumber sizes aren’t just for beginners; they’re smart choices for anyone aiming for efficiency and cost-effectiveness in their woodworking projects.” – Sarah Jenkins, DIY Home Improvement Expert
Step-by-Step Construction Guide
This simplified guide outlines the general process for building your budget-friendly wooden deck box. Always refer to a detailed plan or diagram for exact measurements and cut lists.
Planning and Cutting
Start by meticulously measuring and marking all your wood pieces according to your chosen plan. Use a carpenter’s square to ensure all lines are straight and angles are true. Take your time during this stage, as accurate cuts are crucial for a smooth assembly. Once marked, carefully cut all the pieces using your circular or miter saw. Double-check each piece against your cut list.
Assembling the Base Frame
The base frame provides the structural foundation. This typically involves connecting four legs with horizontal support rails to form sturdy end frames and then joining these to create the full box frame. For robust joints, apply exterior wood glue to all mating surfaces before driving screws. If using a pocket-hole jig, drill the pocket holes in the rails according to the jig’s instructions, then attach them to the legs with pocket-hole screws. Ensure all corners are square before the glue sets.
Building the Sides and Bottom
Once the main frame is assembled, begin attaching your chosen side material—whether individual slats or plywood panels. If using slats, maintain consistent small gaps between them for drainage and airflow. Attach the bottom last, again ensuring there are deliberate gaps or holes for water to escape. For a plywood bottom, make sure it is exterior grade and well-sealed. Fasten all panels securely to the frame using exterior screws and glue.
Constructing the Lid
The lid needs to be sturdy and provide good protection. Build a frame for the lid using smaller dimensional lumber, then attach your lid material (slats or plywood) to this frame. Again, if using slats, incorporate small gaps for drainage. Position the lid on the box and attach your chosen hinges to the back edge of the box and the lid. Install lid supports if you’re using them, following the manufacturer’s instructions for proper placement to ensure safe operation.
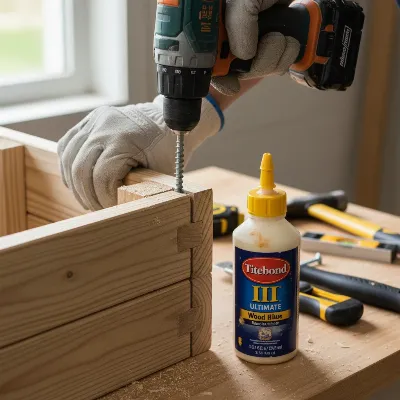 Hands assembling a wooden deck box frame with screws and wood glue on a workshop bench
Finishing Touches
This final stage transforms your raw wooden box into a protected, attractive storage solution.
- Sanding: Thoroughly sand all surfaces, especially edges and any rough spots, to create a smooth finish. Start with a coarser grit (e.g., 80-120) and then move to a finer grit (e.g., 180-220) for a professional feel.
- Priming and Painting/Staining: If you choose to paint, apply an exterior primer first, especially on pressure-treated wood. Once dry, apply at least two coats of exterior paint or stain, following the product’s instructions for drying times between coats. Ensure all surfaces, including the underside of the lid and bottom, are treated for maximum protection.
- Adding Hardware: Install any handles, latches, or decorative elements. Finally, attach the furniture glides or wooden feet to the bottom corners of the deck box to elevate it off the ground, completing your budget-friendly DIY project.
Maintenance Tips for Longevity
To ensure your DIY wood deck box serves you well for many years, regular maintenance is essential.
- Regular Cleaning: Periodically clean the exterior of your deck box with a mild soap and water solution to remove dirt, grime, and mildew. A soft brush can help with stubborn areas. Rinse thoroughly and allow it to dry completely.
- Re-Sealing or Re-Painting: Depending on your climate and the type of finish used, you’ll need to reapply a sealer, stain, or paint every few years. Look for signs of wear, fading, or peeling. Proper reapplication protects the wood from UV damage and moisture intrusion.
- Checking Hardware: Annually inspect all screws, hinges, and lid supports to ensure they are tight and free from rust or corrosion. Replace any damaged hardware promptly to maintain functionality and safety.
- Ensuring Proper Drainage and Ventilation: Periodically check that the drainage gaps in the bottom and sides remain clear of debris. Good airflow prevents moisture buildup inside the box, which can lead to mold, mildew, and wood rot.
Conclusion
Building a DIY wood deck box on a tight budget is a rewarding project that combines practicality with personal satisfaction. By selecting affordable materials like pressure-treated lumber or exterior-grade plywood, simplifying your design, and utilizing essential tools wisely, you can create a functional and attractive storage solution for your outdoor space. Remember, careful planning, precise cuts, and diligent finishing and maintenance are key to a successful and long-lasting build. This hands-on approach not only saves money but also allows you to tailor the perfect deck box to your specific needs and aesthetic preferences. So, why not embark on this project and enjoy the benefits of organized outdoor living?
Frequently Asked Questions
How waterproof will a DIY wooden deck box be?
A DIY wooden deck box, particularly one with drainage gaps, is generally highly weather-resistant but not entirely waterproof. The gaps allow water to drain and air to circulate, which is crucial for preventing wood rot and mildew, but it means small amounts of moisture could enter. For complete waterproofing, you would need a sealed design, often with a waterproof liner, which can sometimes hinder the wood’s breathability and lifespan.
What is the cheapest wood to use for an outdoor deck box?
Pressure-treated lumber is typically the most budget-friendly wood option for an outdoor deck box. It’s designed to resist rot and insects, making it a durable choice for exterior use. While it’s cost-effective, remember that it often needs time to dry thoroughly before you can successfully apply a paint or stain finish.
Do I need special tools to build a deck box?
You can build a basic Deck Box with common hand tools like a measuring tape, square, hammer, and screwdriver, along with a circular saw and drill. However, tools like a miter saw for more precise cuts and a pocket-hole jig for stronger, cleaner joints can greatly simplify the process and improve the final result. Consider borrowing or renting specialized tools to save money.